Prior to injection molding, the movable mold and the fixed mold are closed under the driving of the injection molding machine to form the cavity and the gating system; and the plasticized plastic melt is injected into the cavity by the gating system for cooling solidification, upon cooling solidification, the movable mold and the fixed mold are opened, and plastic parts are ejected by the demolding mechanism.
Two major parts:
Movable mold (installed on the movable mold plate of the injection molding machine)
Fixed mold (installed on the fixed mold plate of the injection molding machine)
Prior to injection molding, the movable mold and the fixed mold are closed under the driving of the injection molding machine to form the cavity and the gating system; and the plasticized plastic melt is injected into the cavity by the gating system for cooling solidification, upon cooling solidification, the movable mold and the fixed mold are opened, and plastic parts are ejected by the demolding mechanism.
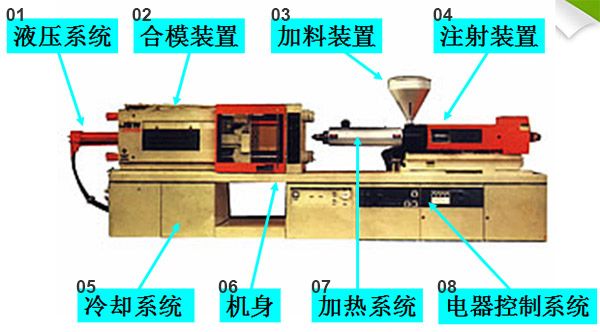
| 1 | 液压系统 | Hydraulic system |
| 2 | 合模装置 | Mold closing device |
| 3 | 加料装置 | Clamping unit |
| 4 | 注射装置 | Injection device |
| 5 | 冷却系统 | Cooling system |
| 6 | 机身 | Machine body |
| 7 | 加热系统 | Heating system |
| 8 | 电器控制系统 | Electrical apparatus control system |
Fig. 3-1 shows the principle of the injection molding of the plunger type injection molding machine
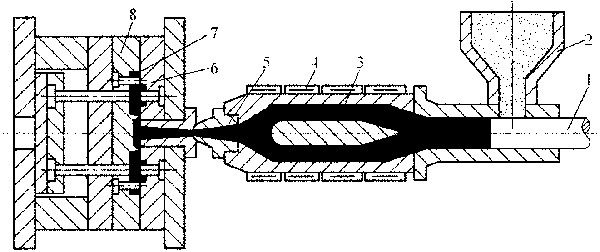
Fig. 3-1 One of injection molding principles 1-Plunger 2-Hopper 3-Spreader 4-Heater 5-Nozzle 6-Fixed mold plate 7-Injection molding part 8-Movable mold plate
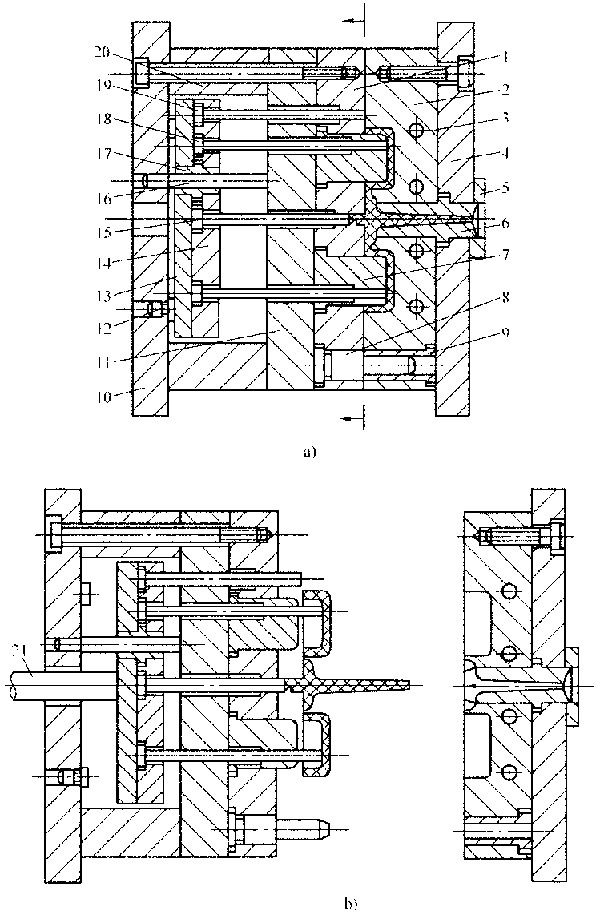
Fig. 4 -1 Structure of injection mold
1-Movable mold plate 2-Fixed mold plate 3-Coolant gallery 4-Fixed clamping plate 5-Locating ring 6-Sprue bush 7-Male mold 8-Guide pillar 9-Guide bushing 10-Moving clamping plate 11-Bearing plate 12-Bearing post 13-Ejector plate 14-Ejector pin retaining plate 15-Sprue puller 16-Ejector guide pillar 17-Ejector guide bush 18-Ejector pin 19-Return pin 20-Cushion block 21-Ejector pin of injection molding machine
1. Formed components and parts Refer to parts or components of the mold, which constitute the cavities of formed products for the mold and come in direct contact with the plastic melt; and after movable and fixed molds are closed, formed parts can determine the internal and external dimensions of injection molding parts.
2. Gating system Refer to the feeding channel from the nozzle of the injection molding machine to the cavity. It is generally composed of main runner, sub-runner, sprue, and cold slug well.
3. Guiding and positioning mechanism Parts that are arranged to achieve accurate guiding and positioning during the closure of movable and fixed molds, such as guide pillar, and guide bushing.
4. Demolding mechanism Refer to a mechanism that ejects plastic parts out of the mold during or upon mold opening. It is generally composed of ejector pin, ejector pin retaining plate, ejector plate, return pin, sprue puller, etc.
5. Side parting and core-pulling mechanism It is used to form plastic parts with side holes or side grooves; and before plastic parts are ejected out of the mold, it is necessary to implement side parting and pull the lateral core out. The mechanism composed of components and parts that complete the above operation is the side parting and core-pulling mechanism.
6. Temperature adjustment system To meet the requirements of the injection molding process on mold temperature, the mold shall be equipped with the cooling or heating system.
7. Exhaust system To exhaust the original air in the cavity and gas escaped from the plastic melt during injection molding, the exhaust system is arranged in the mold, that is, exhaust is achieved through the air discharge duct arranged on the parting surface, or the fit clearance of ejector pin, and mold insert.
8. Mold base
1. Classified by overall structural characteristics of mold
1) Injection mold with single parting surface
During mold opening, the movable mold is separated from the fixed mold, and plastic parts and the condensates of the gating system are taken out of the single parting surface. It is also called as the double (two)-plate injection mold.
2) Injection mold with double parting surfaces
There are two different parting surfaces, which are used for taking plastic parts and condensates out. A cavity plate (also known as intermediate plate or runner plate) that can make reciprocating motion is arranged additionally between the movable mold plate and the fixed mold plate. It is also called as the three-plate type injection mold
3) Injection mold with side parting and core-pulling mechanism
When there are side grooves or side holes in plastic parts, plastic parts shall be formed with the core or the slider that can make lateral movement.
4) Injection mold with movable formed parts
In terms of the special structures of plastic parts, the mold shall be equipped with movable formed parts; and during mold opening, formed parts can be taken out of the mold together with plastic parts, and then, are separated from plastic parts manually or with the simple tool, which are put back to the mold.
5) Injection mold with maneuverable screw thread unloading
For plastic parts with screw threads, in case of automatic demolding, the rotational threaded core or the mold ring with screw thread can be arranged on the mold, and the actuating device (or special transmission) is arranged through the mold opening of the injection molding machine to drive the threaded core or the mold ring with screw thread to rotate, thereby demolding plastic parts.
6) Injection mold without runner
It means that there are no condensed materials in the runner in the gating system. The injection mold includes the heat insulating runner and hot runner mold for thermoplastic plastics, the warm runner injection mold for thermosetting plastics, and other molds.
2. Classified by capacity of mold cavity
Generally, the injection mold with the capacity of the mold cavity up to 3000cm3 above is called as the large-sized injection mold. The large-sized injection mold is high in difficulty in design and manufacturing, and high in manufacturing costs. It is necessary to deliberately consider the fluidity of the plastic melt, the mechanical properties of the mold, and temperature adjustment system. Customarily, the injection mold with the capacity of the mold cavity of 100cm3 and below is called as the small-sized injection mold. The medium-sized injection mold falls in between them.
1. Injection mold with single parting surface
2. Injection mold with double parting surfaces
The injection mold with double parting surfaces has two parting surfaces, which is shown as Fig.
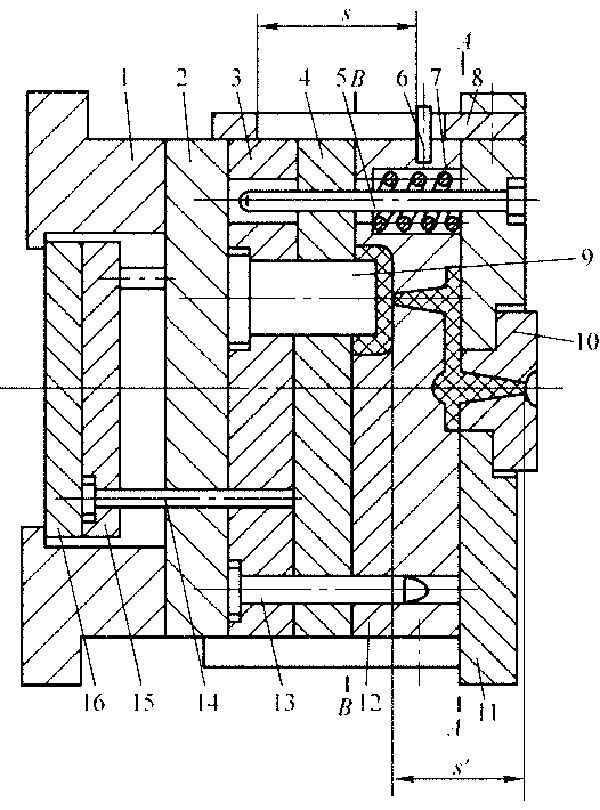
4-2
Fig. 4-2 Injection mold with double parting surfaces 1-Mold leg 2-Bearing plate 3-Movable mold plate 4-Stripper plate 5-Guide pillar 6-Spacer pin 7-Spring 8-Puller plate 9-Male mold 10-Sprue bush 11-Fixed mold plate 12-Intermediate plate 13-Guide pillar 14-Ejector pin 15-Ejector pin retaining plate 16-Ejector plate
3. Injection mold with slider angle pin for side parting and core-pulling
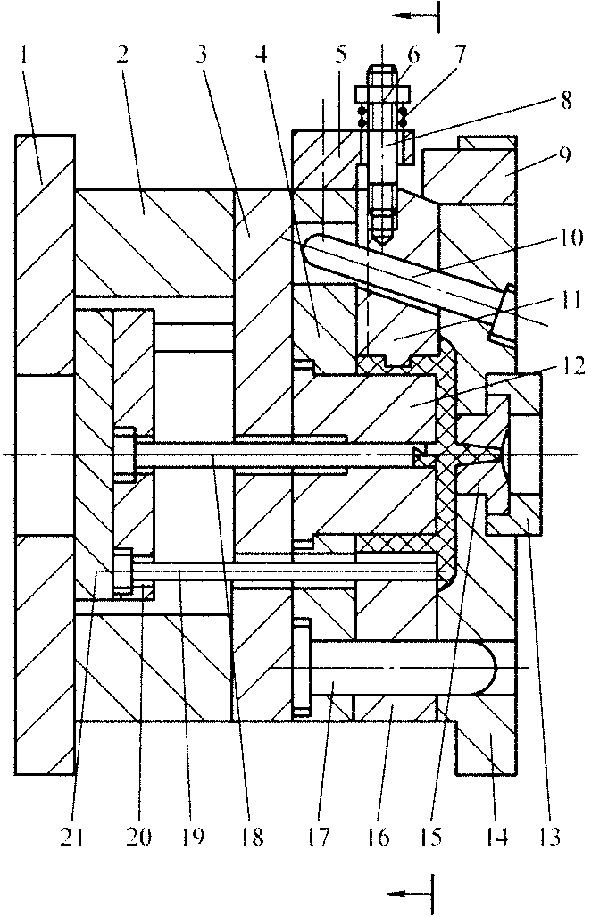
Fig. 4-6 Injection mold with slider angle pin for side core-pulling
1-Moving clamping plate 2-Cushion block 3-Bearing plate 4-Punch-retainer plate 5-Stop dog 6-Nut 7-Spring 8-Slider pull rod 9-Wedge block 10-Slider angle pin 11-Side core slider 12-Male mold 13-Locating ring 14-Fixed mold plate 15-Sprue bush 16-Movable mold plate 17-Guide pillar 18-Sprue puller 19-Ejector pin 20-Ejector pin retaining plate 21-Ejector plate
4. Injection mold with angled-lift splits for side parting and core-pulling
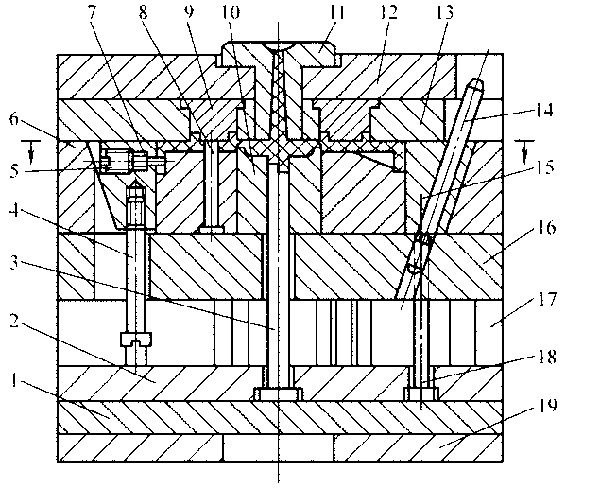
Fig. 4-7 Injection mold with angled-lift splits for side core-pulling
1-Ejector plate 2-Ejector pin retaining plate 3-Sprue puller 4-Limit screw 5-Screw plug 6-Movable mold plate 7-Side core 8-Core 9-Fixed mold insert 10-Movable mold insert 11-Sprue bush 12-Fixed clamping plate 13-Fixed mold plate 14-Sprue puller 15-Angled-lift splits 16-Bearing plate 17-Cushion block 18-Ejector pin 19-Moving clamping plate
1. Purpose and scope of application
To ensure the rationality and consistency of the mold making and machining process, optimize the machining process, and improve the progress of mold making, it is hereby to lay out this standard.
2. Standard for Mold Machining Process
When preparing the process card, the process technician shall indicate process allowance, the direction of allowance, requirements of roughness, and precautions in detail in the process card. Preparation principle of machining process flow card: On the premise of ensuring accuracy, and quality, equipment with high machining efficiency shall be used preferentially. The machining efficiency of milling machine, CNC, and grinding machine is higher than that of wire-electrode cutting, and electrical pulse, and especially, the machining efficiency of electrical pulse is the lowest. Dimensions on drawings shall not be modified randomly (only the technician is permitted to modify).
Principle of machining reserved allowance: For workpieces to be machined under heat treatment, prior to heat treatment, the dimension of feed preparation for appearance shall have the additional reserved allowance of 0.25 mm for the grinding machine on the single side; for parts of mold core and mold insert, which need to be roughly machined by CNC, the reserved allowance on the single side is 0.2mm; the reserved allowance of appearance for the rough milling of the fitter milling machine on the single side is -0.5mm; for workpieces that need to be machined by the grinding machine upon wire cutting, the reserved allowance of formed parts on the single side is 0.05mm, and the grinding allowance of 0.1mm is reserved for the rough machining of appearance; and upon CNC finish machining, and electrical pulse, mirror polishing shall be implemented, with the polishing allowance of 0.03mm on the single side.
Requirements on machining accuracy: The manufacturing accuracy of mold dimensions shall fall within the range of ~0.02mm; the perpendicularity shall fall within the range of ~0.02mm; the coaxiality shall fall within the range of ~0.03mm; and the parallelism of upper and lower planes of parting surfaces of movable and fixed molds shall fall within the range of ~0.03mm. Upon mold closing, the clearance between parting surfaces is smaller than the flash value of formed plastics. The parallelism of fitting surfaces of the rest mold plates shall fall within the range of ~0.02mm; the quality of fit of the fixed part shall fall within the range of ~0.02mm; in case of no plug-in requirements or small influence on dimensions in terms of the small core, the clearance fit of ~0.02mm on both sides can be selected; and the quality of fit of the sliding part includes H7/e6, H7/f7, and H7/g6. Note: In case of any mold insert attached to the step on the mirror polished surface, the fit shall not be too tight, or else, when the mold insert is knocked backwards from the front side, the mirror polished surface is easy to damage by the tool for knocking; and in case of no influence on product dimensions, the clearance fit of ~0.02mm on both sides can be selected.
Principle of removal of electrodes by CNC: In terms of the cavity and core of the mold, the major electrode for appearance shall be removed prior to the removal of other major electrodes, and finally, local electrodes are removed; for the electrode for the appearance of the fixed mold, overall machining shall be considered, wire-electrode cutting can be implemented for undercutting where CNC is inaccessible to ensure the appearance of the fixed mold is integral, without lapping defects; reinforcing ribs, fins, and posts in which the depths of the movable mold are similar shall be machined on one electrode together; deeper fins shall be equipped with mold inserts, and lateral electrical discharge machining shall be implemented separately to prevent carbon deposit during electrical pulse; the electrode of the movable mold shall avoid the case that undercutting must be conducted by wire-electrode cutting upon milling by CNC, and if necessary, it is necessary to split the electrode or conduct wire-electrode cutting directly; and in case of interval exceeding 35mm for rib parts and ribs or posts of the movable mold, it is necessary to make them separately to save copper materials.
Pulse translation clearance table:
| Classification of electrodes | Spark gap | Current | Special | Current | Detailed description of special electrode | Remarks |
| Big electrode (appearance or principal part of product) | Rough blanking s | Rough blanking s | 7A | Principal electrode, local dimension≤1mm | ||
| Fine blanking s | Fine punching s | 4A | ||||
| Common electrode (shut-off and kiss-off, which is smaller than product appearance) | Rough blanking s | Rough blanking s | 5A | Common electrode, localdimension ≤1mm | ||
| Fine blanking s | Fine punching s | 3A | ||||
| Rib electrode | Rough blanking s | Rough blanking s | 5A | The rib electrode is higher than 8mm | ||
| Fine blanking s | Fine punching s | 3A | ||||
| Special rib (-0.7mm) | Fine blanking s |
CNC machining principle: For parts of mold cores and mold inserts, where CNC rough machining is required, the reserved allowance on the single side is 0.2mm; for workpieces that need to be accurately machined by CNC, CNC can machine cavity and core of the mold, which are in place, under the permission of product appearance; and CNC machining is preferred, and in case of failure in the machining of the electrode that is place, it shall be machined with electrical pulse.
Machining process of movable and fixed mold cores: ① Preparation of materials; ② Machining of milling machine: Drilling of water carrying holes (the distance from the deepest position of the choke plug of the water carrying hole to the water carrying hole is 3 to 4mm), drilling and tapping of wire threading holes and threaded holes, drilling and reaming of center holes, mold numbering, benchmark angle, and demising of hanging table; ③ CNC machining: Rough machining; ④ Machining by heat treatment: Indicate hardness requirements; ⑤ Machining by grinding machine: Grinding of six-sided angle square, the appearance is based on the fitting dimension of the mold frame during grinding (in case of one mold core, the boundary dimension is 0.03mm-0.05mm smaller than the drawing dimension, and in case of two mold cores, the sum of the boundary dimensions of two mold cores in the spliced direction is 0.03mm-0.05mm smaller than the drawing dimension)⊥, ∥, and the part that can be formed by the grinding machine must be formed by grinding; ⑥ In case of any mold core that is accurately machined by CNC, it shall be accurately machined by CNC, and in case of any word and mold number on the cavity, it is necessary to conduct lettering; ⑦ Wire-electrode cutting: Central thread machining mold insert holes, lifter holes, center holes, sprue holes, and other holes; ⑧ Electro-discharge machining: Separate machining as indicated by drawings and pulse; ⑨ Polishing: The roughness and requirements of polishing shall be indicated on the process flow card, the polishing area is indicated on workpieces with the marking pen, and where there are requirements on the mirror surface, but failure to meet the requirements within one cycle, rough polishing can be conducted, and upon mold testing, elaborate polishing is conducted; ⑩ Assembly; 11Mold testing.
Machining process of movable and fixed mold cores: ① Preparation of materials: The process technician, according to the sizes and shapes of workpieces, defines whether or not single workpiece machining or multi-workpiece machining is conducted, and in case of multi-workpiece machining, the process technician shall make drawing for the machining arrangement of workpieces; ② Machining by milling machine: The fitter conducts machining and drill water carrying holes according to the drawings of workpieces or the arrangement drawing made by the process technician (the distance from the deepest position of the choke plug of the water carrying hole to the water carrying hole is 3 to 4mm), drilling and tapping of wire threading holes and threaded holes, drilling and reaming of center holes, mold numbering, benchmark angle, and demising of hanging table; ③ CNC machining: Rough machining; ④ Machining by heat treatment: Indicate hardness requirements; ⑤ Machining by grinding machine: Six-sided angle square is ground, and the appearance is ground accurately ⊥, ∥, and the part that can be formed by the grinding machine must be formed by grinding; ⑥ In case of any mold core that is accurately machined by CNC, it shall be accurately machined by CNC, and in case of any word and mold number on the cavity, it is necessary to conduct lettering; ⑦ Wire-electrode cutting: Central thread machining mold insert holes, lifter holes, center holes, sprue holes, and other holes; ⑧ Electro-discharge machining: Separate machining as indicated by drawings and pulse; ⑨ Polishing: The roughness and requirements of polishing shall be indicated on the process flow card, the polishing area is indicated on workpieces with the marking pen, and where there are requirements on the mirror surface, but failure to meet the requirements within one cycle, rough polishing can be conducted, and upon mold testing, elaborate polishing is conducted; ⑩ Assembly; 11Mold testing.
2.8.1: ① Machining by wire-electrode cutting: During medium-speed wire cut, the boundary dimension shall be accurate (view A/B), and during pulling-on, the allowance of the grinding machine is reserved for thickness, and rough machining is implemented at the forming position; ② Machining by grinding machine: Thickness and gradient of grinding, and forming; ③ Electro-discharge machining; and ④ Polishing.
2.8.2: ① Machining by wire-electrode cutting: During medium-speed wire cut of appearance, mold insert holes, and center holes, dimensions shall be accurate (view C), and rough machining is implemented at the hanging table and the forming position; ② Machining by grinding machine: Height, hanging table, and gradient are ground for forming; ③ Electro-discharge machining; and ④ Polishing.
Simple machining process of mold inserts: ① Machining by wire-electrode cutting: During fast cutting, the allowance of the grinding machine is reserved for appearance (view A/B), and during pulling-on, the allowance of the grinding machine is reserved for thickness; ② Boundary dimensions shall be ground accurately, and the hanging table and gradient are ground for forming; ③ Electro-discharge machining; and ④ Polishing.
Machining process of round mold inserts: ① Centerless grinding machine: The boundary dimensions are ground accurately; ② Machining by grinding machine: Undercutting at the hanging table; ③ Machining by wire-electrode cutting: Fast-cutting length (the allowance of 0.1mm for grinding machine is reserved on single side), and center hole and exhaust vent are cut; and ④ Machining by grinding machine: The length is ground for forming.
Machining process of lifter: ① Machining by wire-electrode cutting: During medium-speed wire cut of appearance, the allowance of the head plug-in surface is reserved for grinding-in, the rest dimensions shall keep accurate during grinding, during pulling-on, the allowance is reserved for thickness, and during the rough machining of the I-groove, the allowance of grinding machine is reserved; ② Machining by grinding machine: Thickness and I-groove are ground; ③ Assembly; ④ Pulse ⑤ Polishing; ⑥ Oil groove is formed by the milling machine.
Machining process of lifter set: ① Preparation of strips by fitter: 1.5mm is reserved respectively on both sides for height, 0.5 mm is reserved respectively on both sides in width direction, and 5 mm is reserved respectively on both sides in length direction, which facilitate wire-electrode cutting and clamping; ② Machining by milling machine: Drilling and tapping of threaded holes; ③ Heat treatment; ④ Machining by grinding machine: Six-sided angle square is ground, and width is ground accurately; ⑤ During the fast-cut wire-electrode cutting, the I-groove shall be accurate, during pulling-on, the allowance of the grinding machine is reserved for thickness, and height is +1.2 mm; and ⑥ Machining by grinding machine: The boundary dimensions of grinding machine, the ejector pin plate is equipped, and height is +1mm.
Machining process of lift guide block: ① Machining by wire-electrode cutting: During fast cutting of appearance, the allowance of grinding machine is reserved; ② Machining by grinding machine: Six-sided angle square is ground, and appearance is ground accurately; ③ Machining by milling machine: Wire threading holes, and penetration of screws through holes; and ④ Machining by wire-electrode cutting: Fast cutting of lifter guide hole.
Machining process of slider base: ① Preparation of materials; ② Machining by grinding machine: Six-sided angle square is ground, and appearance is ground accurately; ③ Machining by milling machine: Drilling of wire threading holes, and drilling and tapping of threaded holes; ④ Machining by wire-electrode cutting: Fast cutting of slider angle pin holes; and 5 CNC finish machining, the forming position shall be milled accurately.
Machining process of pressure block: ① Preparation of materials; ② Machining by milling machine: Penetration of screws through holes, and rough machining at forming position (allowance of grinding machine is reserved on single side); and ③ Machining by grinding machine: Six-sided angle square is ground, and appearance is ground accurately for forming.
Machining process of locking block: ① Preparation of materials; ② Machining by grinding machine: Six-sided angle square is ground, and appearance is ground accurately; ③ Machining by wire-electrode cutting; fast-cut forming; and ④ Machining by milling machine: Drilling and tapping of threaded holes.
Machining principle of ejector pin holes: Ejector pin holes with Φ3 above (including Φ3, Φ4, Φ5, and Φ6) are drilled and reamed with the milling machine; and ejector pin holes with Φ3 below or non-standard holes are machined with wire-electrode cutting, and clearance is ensured at the bottom.
Machining principle of wire threading holes: During the wire-electrode cutting of holes, the circumference of the inner wall is above Φ3 (including Φ3), it is necessary to drill wire threading holes.
During the machining of trade marks, the mold for mirror polishing shall be used, ① The allowance is reserved at trade marks upon the CNC finish-milling of the mold core; ② Medium-speed wire cut: Trade mark mold insert hole; ③ Electro-discharge machining: The depth of the hanging table is accurate; ④ The trade mark core is equipped, and the fixture is installed; and 5 Allowance at trade marks is made up with pulse; and ⑥ Polishing.
Machining process of mold base: ① Machining by milling machine: Interior casing is chamfered, threaded hole, center hole, waterline hole, sprue cup through hole, and lifter through hole are drilled; ② CNC machining: Counter bore of iron sprue cup, lifter set hole, guide block hole, slide groove, and plate A of hot runner mold shall be machined through CNC, and mold leg is lettered.
Core machining process of mounting rack with grid reinforcing ribs: During the machining of core ribs of such mounting rack, different machining processes are selected based on different mold categories. ① For Class A molds, we use the integral electrode to ensure the uniformity of products; and ② During the selection of machining processes of non-Class A molds, adjustment can be conducted based on the actual machining volume. The electrode can be divided into split electrode and integral electrode, and if the rib is the straight slot, wire-electrode cutting can be conducted for rough machining before fine trimming by grinding machine.
The machining flow of part of workpieces (e.g., multi-functional dual-jack core) that need wire cut fixture or electrode, and workpieces that need batch pulses is as below: ① CNC arrangement drawing is made; ② The fixture or the electrode is machined by wire-electrode cutting based on the dimensions of the drawing; ③ Upon wire-electrode cutting, if the electrode needs to be machined by CNC, it is delivered to CNC, and the fixture is delivered to the fitter; ④ The electrode is machined by CNC, and the discharge diagram is made; ⑤ Pulse machining; and 6 Polishing.
Calculation of height of support pillar: The height of the support pillar for the mold base with less than 3030 is -0.1mm higher than the mold leg, the mold base with 3030 is 0.1mm higher than the mold leg, the mold base with 3535 is -0.12mm higher than the mold leg, and the mold base with more than 3535 is -0.15mm higher than the mold leg.
Machining process of ejector pin:
2.24.1 ① For the grinding machine for ejector pins with Φ2 and above, the allowance of the grinding machine is reserved for cutting length; and ② Machining by grinding machine: Length shall be accurate (machined by the fitter).
2.24.2 ① During the wire-electrode cutting of ejector pins with less than Φ2, cutting dimensions shall be accurate.
2.24.3 ① For the wire-electrode cutting of flat ejector pins and ejector sleeve, the allowance of the grinding machine is reserved for cutting length; and ② Machining by grinding machine: Length shall be accurate.
3. Machining process of special mold (test mold)
Design principle: If multiple products with the same injection molding material are made on one mold, splicing design is used preferentially.
Machining principle: Equipment with high machining efficiency is used preferentially. It doesn’t have requirements on appearance, which only needs to ensure assembly dimensions.
4. Application of process
The above mentioned is only the basic machining process, and special cases are required separately.
Each machining group shall machine in strict accordance with the requirements of the process card, and in case of improper process, please reflect it to the superior.
Manufacturing a set of high-end magnificent and classy mold not only needs the excellent mold design level and the precise machining process, but also needs the precise mold development concept. What is the precise the mold development concept? Many persons highly disapprove of this concept, considering why they don’t have the precise concept even with the experiences of manufacturing so many molds? Actually, the mold lies not in the number of manufacturing, but in the pursuit of keep-improving details and reliable standards in mold development. The “more or less” concept is absolutely not permitted in the process.
Manufacturing a set of high-end magnificent and classy mold not only needs the excellent mold design level and the precise machining process, but also needs the precise mold development concept. What is the precise the mold development concept? Many persons highly disapprove of this concept, considering why they don't have the precise concept even with the experiences of manufacturing so many molds? Actually, the mold lies not in the number of manufacturing, but in the pursuit of keep-improving details and reliable standards in mold development. The "more or less" concept is absolutely not permitted in the process.
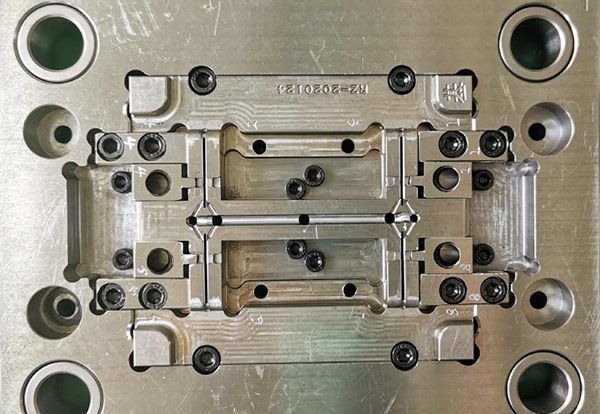
1. The nameplate of the mold shall be complete in content, clear in characters, and regular in arrangement.
2. The nameplate shall be fixed to the position close to the mold plate and the reference angle on the mold leg. The nameplate shall be fixed reliably, and difficult in stripping.
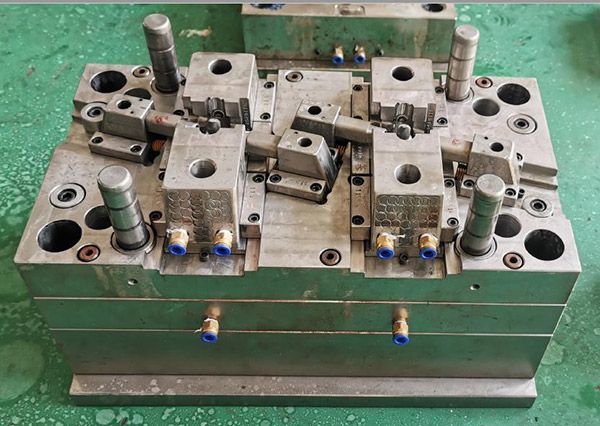
3. Unless otherwise specified by customers, it is necessary to select the plastic fast-plug water nozzle as the coolant water nozzle.
4. The cooling water nozzle shall not extend out of the surface of the mold base.
5. The cooling water nozzle shall be countersinked, with the diameter of 25mm, 30mm, or 35mm; and the orifice is shall be chamfered evenly.
6. The coolant water nozzle shall have inlet and outlet marks.7. The English characters and numbers of marks shall be larger than 5/6 in size, and shall be located at 10mm right under the water nozzle, which shall be legible and regular in writing, attractive in appearance, and uniform in spacing.
8. Mold accessories shall not affect the hoisting and storage of the mold. During installation, in case of any oil cylinder, water nozzle, pre-reset mechanism, and other accessories exposed below, it is necessary to arrange support legs for protection.
9. During the installation of support legs, screws shall be fixed to the mold base across the support legs, and overlong support legs can be fastened on the mold base with the lathed external threaded post.
10. The dimension of the ejection hole of the mold shall comply with the requirements of the specified injection molding machine, and it is forbidden to apply only one center ejector, except for the small-sized mold.
11. Unless otherwise specified by customers, the locating ring shall be fixed reliably, with the diameter of 100mm or 250mm; and the locating ring is 10 to 20mm higher than the base plate.
12. The boundary dimension of the mold shall comply with the requirements of the specified injection molding machine.
13. For any mold for which there are requirements in the direction of installation, it is necessary to mark the direction of installation with the arrow on the front mold plate or the rear mold plate; and the “UP” word shall be marked next to the arrow, the arrow and the word shall be yellow in color, and the word height shall be 50 mm.
14. The surface of the mold base shall be free of dents, rust, unnecessary lifting rings, incoming/outgoing stream, oil holes, and other defects that affect appearance.
15. The mold shall be convenient to hoist and transport; and during hoisting, the components and parts of the mold shall be disassembled, and the lifting ring shall not be intervened with the water nozzle, the oil cylinder, the pre-push-pack pin, etc.
1. The mold base shall comply with the standard.
2. The formed parts of the mold and the gating system (core, movable and fixed mold inserts, movable insert, sprue spreader, ejector pin, and sprue bush) shall be made of materials with performance higher than 40Cr.
3. During the forming of plastics that are easy-corrosive to the mold, the formed parts shall be made of corrosion-resistant materials, and it is necessary to take anti-corrosive measures for formed surfaces.
4. The hardness of the formed parts of the mold shall not be lower than 50HRC, or the hardness of surface-hardening treatment shall be higher than 600HV.
1. During ejection, it is necessary to ensure smoothness, and no clamping stagnation, and abnormal sound.
2. The surface of the lifter shall be polished, which shall be lower than the core surface.
3. The sliding component shall be provided with the oil groove, and shall be subjected to nitrogen treatment on the surface; and upon treatment, surface hardness shall be HV700 above.
4. All ejector pins shall be equipped with standstill positioning, each shall be numbered.
5. The ejection distance shall be limited by the limited block.
6. It is necessary to select the standard part as the return spring, and two ends of the spring shall not be polished and cut off.
7. It is necessary to set range limit for the slider, and the loose core, and to set spring limit for the small slider; in case of inconvenience for spring installation, ball catches can be used; and it is necessary to arrange the travel switch for the loose core of the oil cylinder.
8. Generally, the core pulling of the slider is conducted with the slider angle pin, and the angle of the slider angle pin shall be 2° to 3° smaller than that of the slider locking surface. In case of overlong travel for the slider, pulling shall be implemented by the oil cylinder.
9. When the end face of the formed part of the loose core of the oil cylinder is wrapped, the oil cylinder shall be equipped with the self-locking mechanism.
10. The wear-resisting plate shall be arranged on the lower side of the large slider with width exceeding 150 mm, which shall be made of T8A material; and upon thermal treatment, the hardness ranges from HRC50 to 55, the wear-resisting plate is 0.05 to 0.1 mm higher than the large surface, and the oil groove is formed in the slider.
11. The up-and-down leap of the ejector pin is not permitted.
12. The ejector pin is equipped with barbs, the directions of barbs shall keep consistent, and barbs shall be removed from the product.
13. Fit clearance between the ejector pin hole and the ejector pin, the length of the adhesive sealing section, and the surface roughness of the ejector pin hole shall comply with the requirements of relevant enterprise standards.
14. The product shall be convenient to take down by the operator.
15. During the ejection of the product, the project is easy to move along with the lifter, grooving or etching shall be implemented on the ejector pin.
16. The stripper bar fixed on the ejector pin shall be firm and reliable, the non-formed part around it shall have the gradient of 3° to 5° upon machining, and the lower part shall be chamfered.
17. There shall be no scrap iron, and other impurities in the oil-way hole in the mold base.
18. The end face of the push back pin shall be smooth, without spot welding. There shall be no gasket and spot welding at the bottom of the base head.
19. The sprue plate of the 3-plate mold is smooth in guiding slide, and easy to draw back.
20. The limit pull rods of the 3-plate mold shall be arranged on two sides of the mold in the direction of installation, or the pulling plate is arranged additionally outside the mold base to prevent the limit pull rods from being intervened with the operator.
21. The oil-way air passage shall be smooth, and the return of hydraulic ejection shall be ensured.
22. The exhaust port shall be formed at the bottom of the guide bushing.23. There shall be no clearance during the installation of the positioning pin.
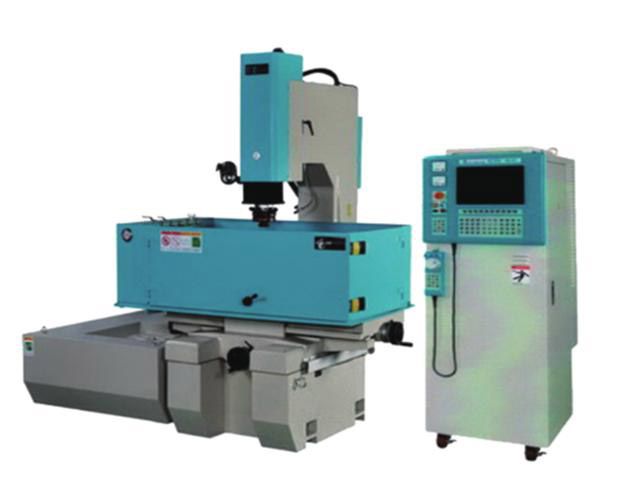
1. The cooling or heating system shall be fully smooth.
2. Sealing shall be reliable, and the system shall be free of leakage and easy to overhaul under the pressure of 0.5MPa.
3. The dimension and shape of the seal groove formed in the mold base shall comply with the requirements of the relevant standards.
4. The seal ring shall, when being placed, be coated with grease, which shall be higher than the mold base surface after being placed.
5. Spacers of water and oil runners shall be made of materials that are not easy to corrode.
6. Concentrated water feeding shall be applied for cavity and core.
1. During arrangement, the sprue shall not affect the appearance of the product, and shall meet the assembly requirements of the product.
2. The section and length of the runner shall be reasonable in design, that is, it is necessary to shorten the process, and reduce the sectional area to shorten filling and cooling time on the premise of ensuring the forming quality, while keeping the minimum loss in the plastics of the gating system.
3. The partial section of the branched runner of the three-plate mold on the reverse side of the front mold plate shall be in the trapezoid or semi-circular shape.
4. In case that there are breaking materials on the sprue plate of the three-plate mold, the diameter of the sprue inlet shall be smaller than 3 mm, and a 3 mm-depth step that is recessed in the sprue plate shall be arranged at the ball end.
5. The ball-end sprue puller shall be fixed reliably, which can be pressed under the locating ring, or can be fixed with grub screws, or can be pressed by the pressing plate.
6. The sprue, and the runner shall be machined as specified in drawing dimensions, and manual machining or machining with polishing machine is not permitted.
7. The pin-point gate shall comply with the requirements of the specification.
8. The front end of the branched runner shall be extended as the cold slug well.
9. The sprue puller shall keep smooth transition during Z-shaped undercutting
10. The branched runner on the parting surface shall be in the circular shape, and cavity and core shall be free of dislocation.
11. The submarine gate on the ejector beam shall be free of surface shrinkage.
12. The diameter and depth of the cold slug well of the transparent product shall comply with the standards of design.
13. Materials are easy to remove, there is no any sprue trace for the appearance of the product, and there are no residual materials at the assembly of the product.
14. In the hooked submarine gate, two inserts shall be subjected to nitrogen treatment, and the surface hardness is up to HV700.
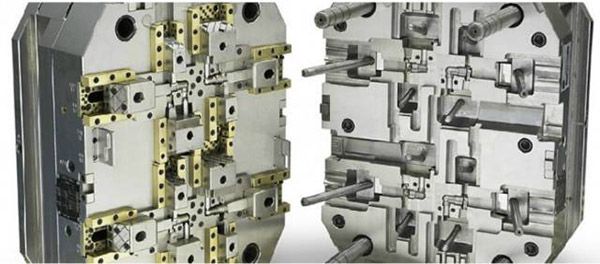
1. The wiring of the hot runner shall be reasonable in layout for easy access, and wiring numbers shall be in one-to-one correspondence.
2. The hot runner shall be subjected to the security test, and insulation resistance against ground is larger than 2MW.
3. In terms of temperature control cabinet and hot nozzle, standard parts shall be applied in the hot runner.
4. The main gate is connected with the hot runner with screw threads, and the bottom plane is in contact seal.
5. The hot runner comes in good contact with the heating plate or the heating bar, the heating plate is fixed with screws or studs, and surfaces are in a reasonably good fit.
6. The J-shaped thermocouple shall be applied, which is matched with the temperature-controlled meter.
7. Each set of heating elements shall be controlled by the thermocouple, and the thermocouple shall be reasonable in layout.
8. The nozzle shall meet the requirements of design.
9. The hot runner shall be reliable in positioning, and shall be at least provided with two locating pins, or be fixed with screws.
10. The heat insulation pad shall be arranged between the hot runner and the mold plate.
11. The error between temperature set by the temperature-controlled meter and actually displayed temperature shall be smaller than ±5°C, and temperature control shall be sensitive.
12. The cavity and the nozzle mounting hole shall be run through.
13. The wires of the hot runner shall be bundled, which are covered with the pressing plate.
14. There are sockets with the same specification, which shall be marked clearly.
15. The control line shall be sheathed, without damage.
16. The temperature control cabinet is reliable in structure, and there is no loose connection in screws.
17. The sockets are installed on the bakelite plate, which shall not exceed the max. dimension of the mold plate.
18. The wires shall not be exposed out of the mold.
19. There shall be fillet transitions at all positions of contacting the wires on the hot runner or the mold plate.
20. Prior to the assembly of the mold plate, all lines shall be free of open circuit or short circuit.
21. All wires shall be connected correctly, and excellent in insulating property.
22. Upon the installation and clamping of the mold plate, all lines shall be checked again with the multimeter.
1. The surfaces of cavity and core shall be free of unevenness, pits, rust, and other defects that affect appearance.
2. The insert is matched with the mold frame, and there are clearances of less than 1 mm at filleted corner around.
3. The parting surface shall keep clean and neat, and shall be free of the clearance of the hand-held grinding wheel, and there shall be no recess in the adhesive sealing section.
4. The depth of the air discharge duct shall be smaller than the flash value of plastics.
5. Inserts shall be full in grinding, smooth in placement, and reliable in location.
6. Inserts, insert cores, and other parts shall be located and fixed reliably, round parts shall be equipped with standstill locking, and copper sheets and iron sheets shall not be cushioned under inserts.
7. The end face of the ejector pin shall keep consistent with the core.
8. The formed parts of cavity and core shall be free of undercutting, chamfering, and other defects.
9. The rib is ejected smoothly
10. For products of the multi-cavity mold, unless otherwise specified by customers in locations and dimensions, left and right parts are symmetrical, and shall be marked with L or R at the position where appearance and assembly are not affected, with the word number of 1/8.
11. The mold base locking surface shall be ground fully, with more than 75% area of contact.
12. The ejector pins shall be arranged at the position close to the side wall, and next to the rib and the boss, which shall be as large as possible.
13. It is necessary to mark number of 1, 2, 3, etc. for the same parts.
14. Each kiss-off surface, shut-off surface, and parting surface shall be ground fully.
15. The adhesive sealing section of the parting surface shall comply with the standards of design. Molds with medium size and below range from 10 to 20mm, large-sized molds range from 30 to 50 mm, and the rest is machined for clearance.
16. Texture and abrasive blasting shall keep even, which meet the requirements of customers.
17. For any product with requirements on appearance, it is necessary to take shrink-proof measures for screws on the product.
18. In case of any stud with depth exceeding 20 mm, it is necessary to select the ejection pipe.
19. The wall thickness of the product shall be even, with deviation being controlled within ±0.15 mm.
20. The width of the rib shall be less than 60% of the wall thickness of the appearance.
21. Insert cores on the lifter and the slider shall be fixed reliably.
22. Upon the inserting of cavity into core, or the inserting of core into cavity, there shall be slope locking and machining for clearance at the periphery.
1. The mold shall have the stability of injection molding production and the repeatability of correction in process parameters within the normal injection molding process range.
2. During the injection molding production of the mold, injection pressure shall be generally smaller than 85% of the rated maximum injection pressure of the injection molding machine.
3. During the injection molding production of the mold, the injection rate at the 3/4 travel shall not be lower than 10% of the rated maximum injection rate or exceed 90% of the rated maximum injection rate.
4. During the injection molding production of the mold holding pressure shall be generally smaller than 85% of the actual maximum injection pressure.
5. During the injection molding production of the mold, mold clamping force shall be smaller than 90% of the rated mold clamping force of the applicable model.
6. During injection molding production, products and regrind materials shall be easy and secure to take out (time shall not exceed 2 s).
7. In case of the mold with mold inserts, mold inserts shall be convenient to install, and reliable in fixing.
1. The mold cavity shall be cleaned up and sprayed with rust-preventative oil.
2. Sliding components shall be coated with lubricating oil.
3. The feed port of the sprue bush shall be blocked with lubricating grease.
4. The mold shall be equipped with the mold lock, and the specification shall meet the requirements of design.
5. Spare parts, and vulnerable parts shall be complete, and shall be attached with the schedule and supplier names.
6. Inlets and outlets of water, liquid, gas, and power of the mold shall be sealed through sealing measures to prevent foreign matters from entering.
7. Paint shall be sprayed on the outer surface of the mold, unless otherwise specified by customers.
8. The mold shall be packaged with the damp-proof, waterproof, and bump-proof package, unless otherwise specified by customers.
9. Mold product drawings, structural drawings, drawings of cooling & heating system, hot runner drawings, details of suppliers of spare and accessory parts and mold materials, operation instruction, mold trial reports, certificate of quality for pre-delivery inspection, and electronic document shall be complete.